If you want to install custom firmware Samsung device, please read this article in detail. We have prepared for you a detailed instruction, using which even a beginner will be able to cope with the installation of custom firmware Samsung on any device Samsung. You probably already know that you will need to install the castom recaveras first. It will be very easy to do, you just need to use the instruction provided by us earlier.
If you already have TWRP torches installed on your smartphone, you can start flashing. First, check if your phone has any important data, if necessary, move it to a safe place. The fact is that after flashing all the data stored in the device memory will be deleted and it will be impossible to restore them.
It’s recommended to make a backup copy of the current firmware in advance, so in case of an error you can return to the previous version. The detailed process of backup creation has already been described in our project. With the backup you will be able to restore the original state of your smartphone if necessary.
Where can I find custom firmware Samsung?
Usually such firmware is posted for download on cell phone forums. They can be stored in a branch corresponding to the name of your device, or you can simply use the search engine by entering a query: custom firmware Samsung for “the name of your gadget”. Nothing is complicated here, I think you will find it out without much difficulty.
Installing custom TWRP recovery on any Samsung Galaxy
In this article we will provide detailed instructions on how to install TWRP-recovery, because it has significant advantages when compared with other versions. The developers offer a rather simple and comfortable installation method, which will require the use of a special Odin street. To install new firmware you will not need to get Root-rights, which becomes a big problem for many users. The instruction offered by us was suitable for absolutely all Samsung devices.
You should be aware that after loading the custom recaver you will no longer accept official company updates, which are installed by air. Before starting the firmware, you should make a backup copy of the system so that you can recover to it if necessary. After flashing, the data stored in the device memory is deleted, so make a copy in advance. You can save your contacts in a Google cloud and copy the photos to a flash drive or move them to your computer.
Preparing to install the kastomnogo recaver on Samsung Galaxy through the tools Odin:
1. It is necessary to fully charge the device, so that it does not turn off during the installation of new firmware;
2. Download from the official website USB-drivers to connect your phone to your computer, and then install them;
3. Download Odin;
4. Go to the official website of TWRP, where you need to find the image of custom firmware Samsung in img.tar format. To do this, enter in the search bar the name of your gadget, then select the firmware from the displayed results;

5. Now let’s go to the “Download Links” section, where we click on the Primary (Recomended) link and download the file. This is a special image for Odin. First of all you need to make sure that the file you have chosen is created for your smartphone model, otherwise you may have difficulties in the installation process;

6. If you own an older device that runs on an android 4.4, go to the setting point – security, and then uncheck the box next to “Activation block”. If you do not see this item in the menu, just skip this step.
Before you start installing the firmware, check again; it is important to follow each of the above steps.
Installing TWRP-recovery on your Samsung Galaxy smartphone or tablet:
1. Switch on your computer tools Odin.
2. Run the device, then translate it into Odin Mode. In other words, the boot mode. To do this, turn off the device and press the button “Home”, “Volume down”, as well as “Power”. After that, press the Volume up once to continue the download process. If there is no “Home” key on your device, then press only “Volume Down” and “Power”.
3. Connect your smartphone to your computer and wait for Odin to recognize it. When this happens the blue signal in the upper left corner will be displayed.
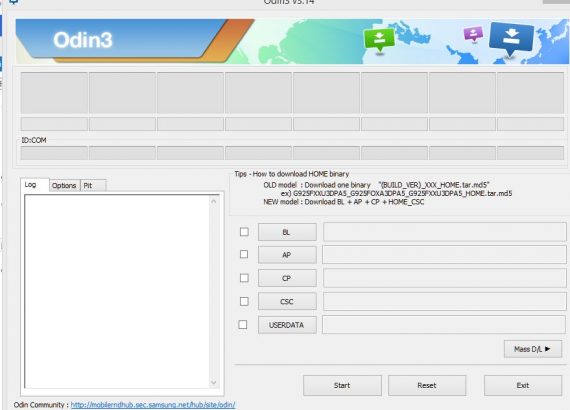
4. Now you need to select the recovery file that you downloaded earlier. It must be in img.tar format, otherwise the tools will not be able to recognize it. We press the “AP” key.
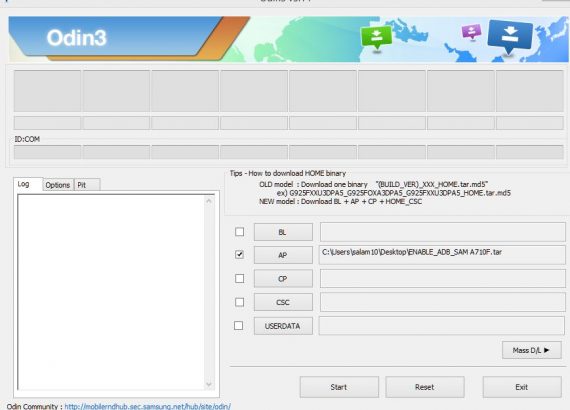
5. Press the “Start” button to start the firmware process.
6. Upon completion of the installation, the tools will notify you of a successful installation, and the smartphone will restart itself.
This completes the installation of TWRP recovery on the Samsung Galaxy, as you can see there is nothing complicated here. Now you can use the new version of the operating system, which will give the device new features and increase its performance, which is extremely beneficial.
Instructions for installing the custom firmware Samsung Galaxy smartphone or tablet:
1. To start with, you need to charge your smartphone at least 70%, or better fully. Otherwise, it may turn off during the firmware process, and this will lead to very sad consequences.
2. You found and downloaded the necessary firmware for the phone model. The firmware should be in zip-archive format, which should be uploaded to the phone’s memory card or its internal memory.
3 If you need Gapps for the firmware, it will be indicated on the page where you downloaded it. In most cases, Google Apps are already built in. But in exceptional cases it happens that the applications need to be downloaded separately, but this is not a problem. If there are no applications, then just download and transfer to your phone, as we did earlier with the firmware. If you do not need applications from Google, then you can simply not download them.
4. Switch to Recovery mode. To do this, completely turn off the gadget, then simultaneously press the “Volume Up”, “Home” and “Power” keys. If on your version of the smartphone there is no key home, then press the same keys, but without it.

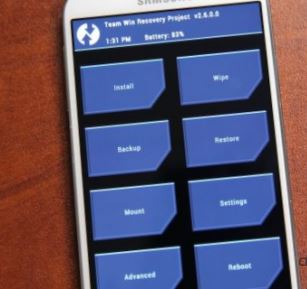
the recovery menu will open:
5. On the main screen you should go to the “Wipe” menu, it is necessary to delete the past firmware before loading a new one. Now press “Advanced Wipe” and check the box next to “Dalvik Cache”, “System”, “Data”, “Cache”. If you select “Internal Storage”, the phone’s internal memory will be cleared, if SD Cards – memory card, but you should not do this.

6. Pull the slider at the bottom of the screen from left to right. This removes the previously selected partitions. We wait for the end of the process and proceed to the next stage.
7. Return to the main screen and click on “Install”.
8. After that the system Manager opens, with the help of which it is necessary to find the downloaded earlier firmware.
9. Drag the slider that appears on the screen from left to right. This is how we start the installation process of the selected firmware. In a few minutes a warning message will appear indicating that the installation was successful. If you are not going to load Gapps, select “Reboot Now” and the device will reboot with new firmware, the process is completed.
10. If you think you will need Gapps applications, then press the “back” or “home” button, after which you need to repeat 7, 8, as well as 9 items of instruction, but instead of a ZIP-file with custom firmware Samsung, choose the file with Gapps. Most often it is called gapps.zip. Wait until the installation is complete and restart the gadget.
This completes the installation of the firmware and all applications. It should be noted that the first launch will last much longer than usual. It can take about 5-10 minutes, it is necessary to configure the system. At this point the same picture or animation will be displayed in front of you, which usually appears when you start the smartphone. After turning on your smartphone you will need to make the initial settings. You need to connect to a Wi-Fi network, specify the current date, time and other parameters that the gadget should know.
You can at any time return the old firmware, for this you can use the backup, which was created earlier. We tried to describe the process of installing custom firmware Samsung in as much detail as possible, but if you have any questions, you can ask them in the comments to this material.
TWRP Recovery – how to install, how to make backups on android, restore the system, install firmware, kernels
Those who use an Android tablet or smartphone on a daily basis often want more functionality than what is provided with the purchase. To do this, you need to get root rights (access to administrator privileges), install custom firmware Samsung, install a different boot animation, and much more.
When a user studies information on changing his device, he often comes across a mention of a modified recovery, which is usually called ClockworkMod Recovery or TWRP Recovery. You can find a general concept of modrecovery and a guide to using ClockworkMod Recovery in other articles, but here we will take a closer look at another well-known type of modified factory menu, namely TWRP Recovery, which was developed by the Teamwin team.
Before we touch on the study of TWRP Recovery features in more detail, it should be noted that in comparison with ClockworkMod, there are a number of features, thanks to which many users prefer to use TWRP:
– The ability to fully use the touch to control the moderation features ;
– more flexible setting of a number of options;
– support for installing multiple zip files at once;
– a detailed menu for choosing what needs to be saved in backups;
– the ability to use the S-Pen on Galaxy Note tablets;
– screen lock and sleep mode using the power button.
User Guide for TWRP Recovery Mode Recovery
1. General information about TWRP
2. Installing TWRP Recovery
3. How to get to the TWRP Recovery menu
4. A detailed examination of the main features in the TWRP Recovery menu
5. Flashing, replacing system files, installing updates, modifications to Android devices using TWRP
What is TWRP Recovery
Let’s get acquainted with what TWRP Recovery is.
In comparison with the standard factory menu, TWRP Recovery has a lot more features available to the user. With it, you can save a complete snapshot of the system, install non-standard software, other firmware, replace the OS kernel, restore the system from a backup, and many other options are available. TWRP is written to a special section of the internal memory of the phone or tablet, replacing the factory recovery.
Often, in a number of seemingly hopeless situations, TWRP Recovery can come to the rescue. Despite the fact that the phone may stop booting, it is not uncommon to use TWRP to fully restore the device from a backup, saving all settings, toolss and their settings.
Here is a short list of the main features of TWRP Recovery:
– Installing alternative (custom) firmware, or kernels;
– Installing system updates, fixes, making adjustments to the features of the gadget;
– Creating a complete backup of the system or its individual parts (application data, system partition, cache, settings);
– Connection via USB cable to a computer as a removable storage device;
– Restoring the previous state of the system from an earlier saved backup copy (backup);
– Editing sections on the memory card (creating, formatting, deleting);
– Ability to reset to factory settings (Wipe – data / factory reset). You can delete only part of the data instead of completely resetting it to its original state: deleting battery statistics (wipe battery stats), clearing the cache (wipe cache), erasing the dalvik-cache (wipe Dalvik-cache);
– Use as a terminal for executing commands;
– Ability to work with system files on a tablet or phone.
Installing TWRP Recovery
It doesn’t take much effort to install TWRP Recovery on most devices. If you install the GooManager application from Google Play, you can use the “Install OpenRecovery Script” function in its menu.

Many gadgets on Android, for example smartphones and Nexus tablets, have specially designed toolss like the Google Nexus 7 Toolkit, where there is a function to install a modified recovery. In addition, using the adb tools, you can also install TWRP Recovery.
How to get into TWRP Recovery
In order to enter the modified recovery menu, you can use several methods:
1. By pressing a special combination of buttons when you turn on the gadget. The combination may differ for different Android device models. For example, on a number of devices, you can get into recovery by holding down the volume up keys and the power button while turning on.
2. Using a specialized tools like GooManager and Titanium Backup, which allow you to select the function of loading into Recovery mode in their menu, the item “Reboot Recovery”.
3. If the drivers corresponding to the gadget are installed on the PC and the connection is configured using the ADB tools (the so-called ADB shell), then by connecting the USB cable from the computer to the device, you can run the command:
Main features and menu of TWRP Recovery
After booting your phone or tablet into TWRP Recovery, the first thing you do is get to the main menu.

This manual covers the features and capabilities of TWRP Recovery version 2.3.2, which is the most relevant at the time of this writing. Other versions of TWRP may have a slightly different interface, but the main functionality will remain the same as in the version we are considering.

The appearance of TWRP recovery may also differ slightly, depending on the specific device and the selected theme.
Since TWRP recovery supports touch control, it is very easy to select the desired menu items and navigate through them – just like with normal use of the gadget, click on the item we need with your finger.
If you want to return to the previous menu, then in each submenu there is a return button in the lower (phone) or upper right (tablet) part of the display. The top also shows the battery percentage and the current time.
features of the main menu items:
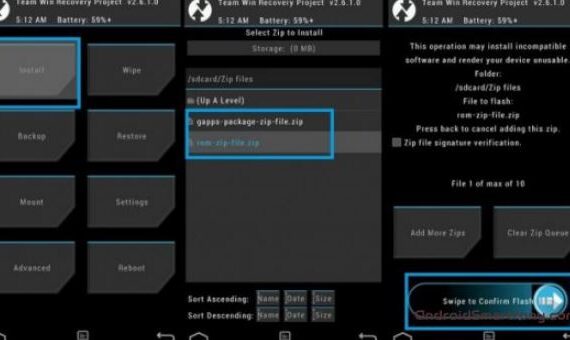
1. Install

Used to install firmwares, patches and modifications.
This is one of the most used TWRP Recovery features.
Using this option, you can install custom (unofficial), official firmware, toolss in the system partition, replace kernels, change bootanimation, themes and more. Updates are installed from files located anywhere on the device’s memory card in zip format.
After selecting the required file, a menu opens in which you can add the next update. Thus, you can create a queue through which the installation of patches will take place (item Add More Zips). After the desired files are selected, you need to start the firmware by pulling the slider from the left side to the right, which is located at the bottom of the display.

Zip Signature verifications can activate digital signature verification of zip files.
The Force MD5 check on all Zips item activates the check of installed updates for compliance with MD5 checksums.
2. Wipe Wipe and delete data menu

In this section, it is possible to clear the phone’s memory, both by completely returning to the factory settings (Factory Reset), and by choosing to clear only a certain part of it, such as the System partition, cache (Cache), or Dalvilk Cache. After applying Factory Reset, the device will return to the state in which it came from the factory.
In addition, it is possible to clear the internal memory (Internal Storage) or external SD card (External Storage), clear the folder where the toolss installed on external media are stored (android_secure) or reset the battery statistics counter (Wipe Battery Stats).
Similar to other executable features , you can confirm your choice using the slider that appears at the bottom of the display. You can cancel the execution of tasks by tapping on the “Back” button.
3. Backup Data or system backup section

This is one of the most important points in the modified recovery. Here you can backup the entire system of your phone or tablet, including application data and device settings – Nandroid Backup.
In this section you can :
– Select the parts of the memory that you want to back up: Data, System, Recovery, Boot, Uboot, Cache, NVram;
– Look at the available space in memory (Free Space);
– Disable the creation of checksums in backup files (Skip MD5 generation during backup);
– Enable compression of backup files (Enable Compression);
– Select the device’s internal memory to save the backup data (Use internal storage);
– Select an external memory card to save backup files (Use external SD);
– Refresh information on free memory in sections (Refresh Sizes);
– Set a name for the backup (Set Backup name).
As before, you can activate the launch of the features you have selected using the slider, after which the progress of the operation will be shown.

When the process is complete, you can reboot the gadget using the Reboot System option, or return to the TWRP main menu using the arrow.
4. Restore Menu for restoring parts or completely of the system from a previously created backup

This section provides the following options :
– Selecting the device’s internal memory as the location where the search for backups will be performed (Use internal storage);
– install an external memory card as a section where the recovery will look for backup (Use external SD).
If you did not change the settings when creating a backup, then by default the names of the backups are the sum of the number and time of creation. Files can be sorted in the following ways:
– ascending (Sort Ascending) or descending (Sort Descending) creation date;
– increasing or decreasing the size of backups.

When the required backup is found, the following choice of features
is provided : – mark the partitions that you want to restore (Data, System, Recovery, Boot, Uboot, Cache, NVram);
– delete this backup (Delete Backup);
– give another name to the selected backup (Rename Backup);
– enable checking MD5 checksums in backup files.
Start the selected operation by confirming the selection using the slider at the bottom of the screen.
5. Mount

Here you can mount and unmount partitions and perform operations on them. When mounted, the data contained on the partition becomes available.
This section has features :
– Mounting, unmounting the system partition (Mount / Unmount System);
– Mounting, unmounting the cache partition (Mount / Unmount Cache);
– Mounting, unmounting the data partition (Mount / Unmount Data);
– Mounting, unmounting the internal memory (Mount / Unmount Internal);
– Mounting, unmounting an external memory card (Mount / Unmount Sdcard);
– Connecting the device to a PC as a storage device (Mount USB storage). Here you can connect an SD card (Use external SD) or the built-in memory of the gadget (Use internal storage) to your PC.
6. Settings Modified recovery settings

Here you can set the settings that TWRP Recovery will use by default when performing features :
– Enable / disable verification of the digital signature of installed files (Zip file signature verification);
– Enable / disable checksum checking for any zip files (Force MD5 check for all zips);
– Erasing files instead of formatting during memory cleaning (Use rm -rf instead of formatting);
– Ignore image size errors during backup;
– Do not create checksums during backup creation (Skip MD5 generation during backup);
– Choose your time zone (Time Zone);
– Return to the default TWRP Recovery settings (Restore Defaults).
7. Advanced Additional TWRP options

Here you can :
– Activate saving the operation log file to the memory card (Copy Log to SD);
– Revert to the original state of access rights to system folders and files, which may be violated by some applications with root privileges. Sometimes a violation of access rights can lead to crashes and freezes of the tablet or phone (Fix Permissions);
– Change partitions on the memory card (create, delete, create swap cache files). Swap is usually used to speed up the performance of Android devices. (Partition SD Card).
Here you can execute the following commands: Copy (copy the file), Move (move the file), Chmod 755 (set the permissions 755, which are the default for all system files), Chmod (set other permissions), Delete (delete the file), Rename File (rename the file);
– Execute a command entered manually in terminal mode (just like with a PC using the adb Sshell interface) (Terminal Command).
8. Reboot

With this item you can reboot the device. Available options :
– reboot into the operating mode of the device (System);
– reboot into recovery (Recovery);
– turn off your tablet or phone (Power Off).
Flashing, replacing system files, installing updates, modifications to Android devices using TWRP
In order to install a different firmware or patch, you need to copy these files in zip format to a memory card or internal memory.
Next, do the following :
1. Boot into TWRP recovery;
2. Select the “Install” function;
3. Select the internal (Use internal storage) or external memory (Use external SD), depending on where we copied the files we need.
4. Find and select the file you want to install.
5. If you have an md5 file with Zip, then you can activate the check of the amounts (Force MD5 check on all Zips), otherwise we do not do this;
6. Start the installation by pulling the slider from left to right.
You can select 10 zip files at once, which will be sequentially installed. At the end of the process, the installation is complete.
When the process ends, it is recommended to wipe cach
ClockworkMod Recovery – installation, backups, system recovery, flashing android devices, and more. dr .
ClockworkMod Recovery – recovery for android devices, an alternative to the factory one, with many useful features : creating backups, restoring the system from a backup, installing firmware and much more.
Any user of a device running on the Android OS who is just beginning to delve into the essence of this operating system, visiting various forums, blogs and sites someday, but will certainly come across a rather strange and mysterious name – ClockworkMod Recovery. Most often, it is mentioned when it comes to replacing the kernel, flashing a smartphone or tablet and other “hacker” shenanigans.
Many people are probably worried about the question, what kind of ClockworkMod Recovery is, and also, what is it for and what to do with it? I will answer these very questions in this article, in the form of a complete instruction manual for ClockworkMod Recovery. In short, ClockworkMod Recovery, or as it is also called CWM, is an alternative recovery for devices running on Android OS. The ClockworkMod Recovery user manual consists of several sections: 1. Recovery. What is it? 2. What is ClockworkMod Recovery and what is it for? 3. Installing the ClockworkMod Recovery utility. 4. Launching the ClockworkMod Recovery utility. 5. Analysis of the ClockworkMod Recovery menu.
6. System recovery, as well as creating backups using CWM.
7. Main features of ClockworkMod: installation of updates, firmware, kernels and other elements on Android devices.
Recovery. What is it?
All devices running on the ANDROID OS have factory recovery, which, if necessary, can be loaded when you turn on your smartphone or tablet, using a special key combination. The factory utility, as a rule, is able to clean the system, as well as install OS updates from the update.zip file.
What is ClockworkMod Recovery and what is it for?
ClockworkMod Recovery is an order of magnitude more powerful system utility than the built-in factory one. Thanks to it, you can create full backups of the Android operating system, and also install various software and all kinds of kernels and firmware on the device, and much more that the factory recovery does not perform. ClockworkMod Recovery is installed instead of the factory menu, in a special section of the internal memory of the device.
There are seemingly hopeless situations in which ClockworkMod Recovery can help. For example, if a smartphone or tablet, for whatever reason, cannot boot, this utility will help restore the operating system, with all its applications and settings.
Below are some of the most important operations that can be done with ClockworkMod Recovery :
1) Connect to a PC via a USB cable when using the removable storage mode.
2) Install unofficial kernels and custom firmwares.
3) Carry out the installation of factory system updates, as well as various fixes and additions.
4) Restore the operation of the device using a previously created copy.
5) Work with the ADB tools by connecting your device to a PC using a USB cable.
6) Carry out the creation of a complete backup of the current firmware, as well as its parts, such as settings, applications and OS.
7) Create and edit sections on the device’s memory card.
8) Go back to factory settings (Wipe – data / factory reset), reset the wipe battery stats, clear the wipe Dalvik-cache and clear the wipe cache.
The ClockworkMod Recovery utility was developed and subsequently created by Koushik Dutta, aka Koush. For most Android devices, there are CWM versions.
Installing ClockworkMod Recovery
It can be noted that for most devices, installing the ClockworkMod Recovery utility is a fairly simple procedure. To do this, you just need to download and install the ROM Manager tools from the Market and run it. The first item on the menu will be – Install ClockworkMod. For other smartphones and tablets, there are other separate utilities which are similar to the Acer Recovery Installer used on the Acer Iconia Tab. Well, or you can install ClockworkMod Recovery on them, but only using the ADB tools, which is an integral part of the Android SDK and you can download it here .
Launching ClockworkMod Recovery
You can load your device into ClockworkMod Recovery in several ways.
1) Using the ROM Manager tools, you will need to select an item in the menu called “Load Recovery Mode”.
2) Using a specific key combination when turning on the Android device. Most often, the combination depends on the brand and model of the tablet or smartphone. But in most cases, this is a combination of pressing the volume down rocker and the power key at the same time.
3) Using the ADB tools. When configuring the connection of your device to a PC using this tools, in order to boot the device you will need to enter the “command”: adb reboot recovery.
ClockworkMod Recovery Menu Analysis
When you boot your tablet into ClockworkMod Recovery utility, first of all you will see its main menu:

The screenshots were taken in ClockworkMod recovery 3.0, one of the most popular and widespread. In other versions, including newer ones, the menu may change slightly, but, nevertheless, its main features , as a rule, remain unchanged.
On many devices, moving through the menu items is done using the volume rocker. And in order to select a specific item, use the power button. However, some Android devices may use other keys, for example, to return to a previous menu.
Whichever submenu you are in, in order to return to the previous menu, you can use the item +++++ Go Back +++++
Let’s move on to assigning the main menu items:
1. reboot system – directly, reboot the device.
2. apply update.zip from sdcard – without a doubt, the item that is used most often.
Thanks to it, it becomes possible to install official and custom firmwares, as well as themes, kernels and other software, which must be in the update.zip file, and you must move it to the root of the memory card. For example, in the file manager of a device running on Android OS, this is the / sdcard folder.
After you have selected this item, you will automatically be taken to the next menu, in which you must confirm your choice by clicking on Yes – Install /sdcard/update.zip

3. wipe data / factory reset – full reset of settings, cache and data. That is, after you use this item, the device will return to the state in which it was sold in the store. CWM will clean the / data and / cache partitions in the internal memory of the device. And also everything will be deleted from the system folder “.android_secure” located on the memory card, including the sd-ext partition.
4. wipe cache partition – clearing temporary data accumulated during the use of the system and various toolss, that is, clearing the / cache partition located in the internal memory. Most often this item is used before starting to install a new firmware or kernel.
5. install zip from sdcard – installs a zip file from a memory card. After you select this item, you will automatically be taken to the following submenu:

And its items mean this:
1) apply /sdcard/update.zip – well, this item fully corresponds to the second item of the main menu “apply update.zip from sdcard”.
2) chooze zip from sdcard – this item is needed in order to select the .zip file on the memory card for installation.
This item is also similar to item 2 of the menu and is used to install various firmware, kernels, and other modifications. But there is still a difference in it – the installation can be done from absolutely any file with the zip extension, having any name, and located anywhere on the memory card. After selecting this item, you will see the entire list of folders and files on the device’s memory card, from which you need to select a .zip file for further installation.

3) toggle signature veritification – enable and, accordingly, disable file signature verification.
When the signature check mode is enabled (Signature check: Enabled), installation of firmware that has not been signed by the developer will become impossible. And most of the unofficial firmware, just the same without the developer’s signature.
4) toggle script assert – enable or disable the assertion script.
This item is needed for internal use in ClockworkMod Recovery, that is, you don’t need it, so it’s better not to touch it at all.
5) +++++ Go Back +++++ – well, this item, as described above, is needed in order to return to the previous CWM menu.
6) backup and restore – this item is needed when creating and restoring device backups. Also, one of the most basic points of CWM. Thanks to him, you can make a complete backup of the tablet system, including all applications along with the data that is located in the internal memory of the device. This procedure is also called “Nandroid backup”, which means “System snapshot”. This is necessary in order to return the smartphone to its previous state. It looks like this:

And its points mean this :
Backup – creating a backup copy of absolutely all partitions in the internal memory of the device.
The copy, after creation, will be located on the memory card. Initially, the name of the backup consists of the time and date of its creation. But it can be renamed. But it should be remembered that the name must consist of numbers and Latin letters, spaces and Russian letters are not allowed.
Restore – restoring all partitions after selecting a specific backup.
After selecting this item, you will see the entire list of available backups located on the memory card. To restore, you just need to select one of them.
Advanced Restore – this item denotes the restoration of only a specific partition from the backup that you choose.
The choice of any individual partition you wish to restore is up to you: system, cache, sd-ext, data, or boot. More details can be seen in the screenshot below:

7) mounts and storage – an item through which you can mount individual partitions, as well as format them and mount the device, as a USB drive when connected to a PC. Once mounted, folders and partitions become available for use.

This menu consists of several items :
1. mount / system – mount the system partition;
2. unmount / data – unmounting the data partition;
3. unmount / cache – unmounting the partition with the cache;
4. mount / sdcard – mount the device’s memory card;
5. mount / sd-ext – mount Linux, namely, the ext partition on the memory card, go if it is available;
6. format boot, format system, format data, format cache – formatting the partitions corresponding to the names.
Important! Be extremely vigilant with these menu items. For example, formatting the system partition will completely destroy your OS, that is, the current firmware. And after you format the boot partition, the device will not boot.
• format sdcard – formatting the device memory card;
• format sd-ext – formatting the Linux partition on the memory card;
• mount USB storage – connecting the device to a PC, in the removable device mode.
8) advanced – use of additional CWM features .

This menu also consists of several items:
1. Reboot Recovery – reboot the device back to recovery;
2. Wipe Dalvik Cache – cleaning the cache of Dalvik – a virtual Java machine used to run various applications. Most often, this menu item is used before starting the installation of custom firmware.
3. Wipe Battery Stat – reset the statistics of the battery operation. This item is most often used to reset incorrect battery meter information.
4. Report Error. This item allows you to inform the developers of the ClockworkMod utility about the error. In this case, the error log is written to the device’s memory card and can be sent using the ROM Manager tools.
5. Key Test – using this item you can check the functionality of the device buttons. It works as follows: when you press a button, its code is displayed on the screen.
6. Restart adb – reboot the ADB server. This item can be used if the device stopped responding to the commands of the ADB tools, when connected to a PC, via a USB cable.
7. Partition SD Card. With this item you can create partitions on the device’s memory card. That is, you can create / sd-ext and / swap partitions on the memory card. The / sd-ext partition is needed for use by certain firmware, in case of insufficient internal memory of the device. And the / swap section is needed in order to speed up the operation of the Android device.
8. Fix Permissions. This item will help you fix the access rights to sections and files. That is, there is a return to the factory state of access rights to files and folders of the system, in the event that changes were made due to the incorrect operation of various root applications, which could lead to failures and freezes in the operation of the device.
System recovery, as well as creating backups using CWM
Well, you already know that thanks to ClockworkMod it becomes possible to create full backups of the device’s firmware. This utility creates snapshots of all the partitions that are in the internal memory of the device, as well as the “.androidsecure” folder, which is located on the memory card. Moreover, the “snapshot” is taken by the OS, along with its settings, and installed applications.
Create a backup (Nandroid Backup):
– Reboot the device to CWM recovery.
– Open the “backup & restore” item.
– Select “backup”.
– Confirm your selection by clicking on “Yes”.
– After creating copies, exit CWM using the “reboot system now” item.
After that go to the clockworkmod / backup folder. It will contain a full backup. Its name, as already mentioned, will consist of date and time, but you can give a different name to the file. Do not use Russian letters under any circumstances.
Restoring the device from a backup using CWM:
– Reboot the device to CWM recovery.
– Click on “Backup & restore”.
– Select “restore”.
– Now you need to select the required backup from the list.
– Well, confirm your choice by selecting “Yes”.
After the recovery is complete, exit CWM using the Reboot system now item.
Note :
Some individual applications from the CWM backup, SMS, as well as WiFi settings, at the same time, without touching the current firmware, you can restore using the AppExtractor application or the Titanium Backup tools .
The main features of ClockworkMod: installing updates, firmware, kernels and other elements on Android devices
All potential firmware, custom kernels and other applications and add-ons that can be installed on the device using CWM are packed in files with the zip extension.
Before installing anything on your smartphone or tablet, make a backup copy of the original firmware, in order to do everything as it was if necessary.
Make sure the device battery is fully charged and disconnect it from the PC and charger.
Copy the file that you want to flash to the root of the memory card, but never unpack it, and also make sure that its name consists only of Latin letters and numbers.
If you are interested in installing a full firmware, then do a full wipe using the “wipe data / factory reset” item.
Only after that proceed with the firmware :
– Insert the memory card into the device.
– Reboot your device to CWM.
– Select “install zip from sdcard”.
– Open the “choose zip from sdcard” item.
– In the window that opens, find the file. It should be at the bottom, right after the list of folders, if there are any.
– Confirm your choice using “Yes”.
– After completing the firmware, return to the previous menu using the “+++++ Go Back +++++” item.
It is also recommended to wipe cach and dalvik cache after flashing the zip files.