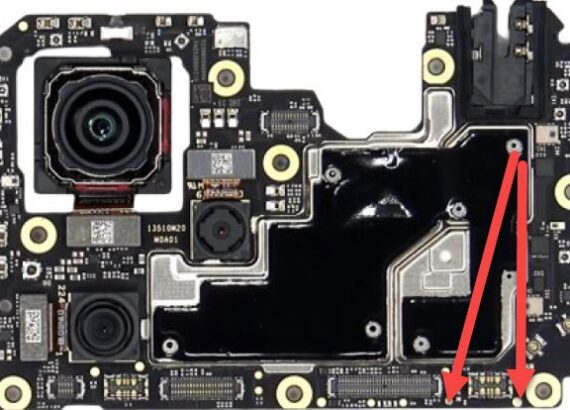
test point for entering EDL mode on the POCO X5 Pro 5G, you typically need to disassemble the device to access the motherboard. Here are general steps to locate the test points:
- Power Off the Device: Ensure that your POCO X5 Pro 5G is completely powered off before proceeding.
- Disassemble the Device: Carefully remove the back cover of your POCO X5 Pro 5G. You may need to use a prying tool to gently detach the cover.
- Locate the Test Points: After removing the back cover, you’ll need to locate the test points on the motherboard. These points are typically small solder pads or pins labeled for test purposes.

- Identify the Test Point: Look for markings or diagrams on the motherboard that indicate the location of the test points. They are usually labeled as “TP” or “Test Point.”
- Short the Test Points: Once you’ve identified the test points, you’ll need to short them using a conductive material or tool. This can be done by gently connecting the test points using tweezers or a piece of wire.
- Connect to PC: With the test points shorted, connect your POCO X5 Pro 5G to your computer using a USB cable.
- Enter EDL Mode: When the device is connected to the computer with the test points shorted, it should enter Emergency Download (EDL) mode automatically. You can verify this by checking the device manager on your computer for the Qualcomm HS-USB QDLoader 9008 or QHUSB_BULK driver.
Once your POCO X5 Pro 5G is in EDL mode, you can use compatible software tools like Mi Flash Tool or QPST to flash firmware, unbrick the device, or perform other troubleshooting tasks.
Please note that performing hardware modifications like accessing test points may void your device warranty, and it requires careful handling to avoid damaging the device components. If you’re not comfortable with these procedures, it’s advisable to seek assistance from a professional technician.