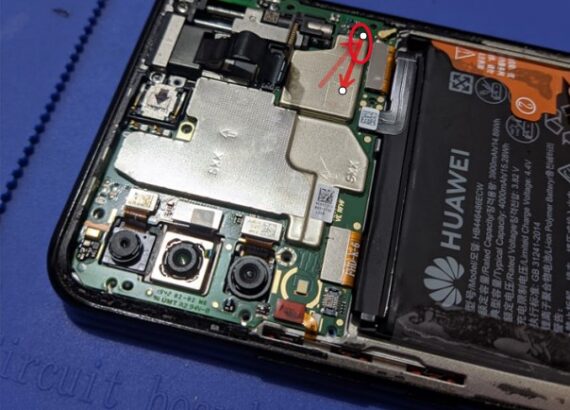
Flashing AND REMOVE FRP Huawei Y9 Prime 2019 test point involves using specific hardware points on the device’s circuit board to force it into a mode where it can be detected by flashing tools. However, flashing devices through test points is a complex process that carries significant risks, including damaging the device irreparably if not done correctly. It’s crucial to proceed with caution and only attempt this if you have the necessary technical expertise and understanding of the process.
IMAGE y9 prime 2019 test point

Here’s a general outline of the steps involved in flashing a Huawei Y9 Prime 2019 test point:
- Identify Test Points: Locate the test points on the Huawei Y9 Prime 2019’s motherboard. Test points are usually small soldering points labeled TP1, TP2, etc. You may need to refer to technical documentation, forums, or guides specific to your device to find the exact locations of these points.
- Short Test Points: With the device powered off, carefully short the designated test points using a conductive material, such as tweezers or a metal wire. This step is crucial for putting the device into a mode where it can be detected by the flashing tool.
- Connect the Device to the Computer: After shorting the test points, connect your Huawei Y9 Prime 2019 device to your computer using a USB cable.
- Use Flashing Software: Launch the flashing software on your computer. Popular flashing tools for Huawei devices include Huawei’s official HiSuite, SP Flash Tool, or Miracle Box.
- Load Firmware Files: In the flashing software, locate and load the firmware files (usually in the form of a scatter file or a firmware package) for your Huawei Y9 Prime 2019 device.
- Start the Flashing Process: Follow the on-screen instructions provided by the flashing software to start the flashing process. This may involve selecting specific options or configurations depending on the flashing tool you’re using.
- Wait for Completion: Once the flashing process begins, wait patiently until it completes. Do not disconnect the device from the computer or interrupt the process as it may result in a bricked device.
- Finish and Reboot: After the flashing process is complete, the software should display a success message. You can then safely disconnect your device from the computer and reboot it.
What is the situation huawei y9 prime 2019 test point
Removing a Google account (Google FRP – Factory Reset Protection) from a Huawei Y9 Prime 2019 test point is not a standard method and is not recommended. Test points on a device are typically used for hardware-level operations, such as flashing firmware or entering special modes like EDL (Emergency Download Mode).
To remove a Google account Huawei Y9 Prime 2019, you should follow standard software-based procedures, such as factory resetting the device through the settings menu and then bypassing the Google account verification during the setup process.
Attempting to manipulate the device’s hardware using test points to bypass Google account verification is not only technically complex but also potentially risky and may lead to damage to the device if done incorrectly. Additionally, using such methods may violate the terms of service of the device manufacturer and could be illegal in some jurisdictions.
If you’re experiencing difficulties with Google account verification on your Huawei Y9 Prime 2019, I recommend reaching out to Huawei customer support or seeking assistance from a professional technician who is experienced with Huawei devices. They can provide guidance and support to help you resolve the issue through safe and appropriate methods.
huawei y9 prime 2019 test point all mode
Huawei Y9 Prime 2019 doesn’t officially support Emergency Download Mode (EDL), which is common in Qualcomm-based devices. However, Huawei devices typically have their own modes for flashing or emergency purposes.
For Huawei devices, including the Y9 Prime 2019, the common modes used for flashing firmware or performing emergency operations include:
- Fastboot Mode: This mode allows you to flash system images, unlock bootloader (if allowed), and perform other advanced tasks. To enter Fastboot mode, you typically power off the device, then press and hold a combination of keys (often Volume Down + Power) until the Fastboot screen appears.
- Recovery Mode: Recovery mode is used for performing system-level operations like factory resets, applying OTA updates, and clearing caches. You can usually access Recovery mode by powering off the device, then pressing and holding a combination of keys (often Volume Up + Power) until the Recovery menu appears.
- Download Mode: Some Huawei devices have a Download mode similar to EDL mode in Qualcomm devices. In Huawei devices, it’s often called “Huawei Update Mode” or “Huawei Rescue Mode.” However, it’s accessed differently depending on the model and software version. Typically, you can enter this mode by powering off the device, then connecting it to a computer while holding a specific key combination or using a specific tool provided by Huawei.
It’s important to note that entering special modes like Fastboot, Recovery, or Download mode may vary slightly depending on the device’s model and software version. Always refer to official documentation or reliable sources specific to your device for accurate instructions on entering these modes. Additionally, performing operations in these modes may void warranties and could potentially brick your device if not done correctly. Proceed with caution and ensure you have a good understanding of the process before attempting any modifications.