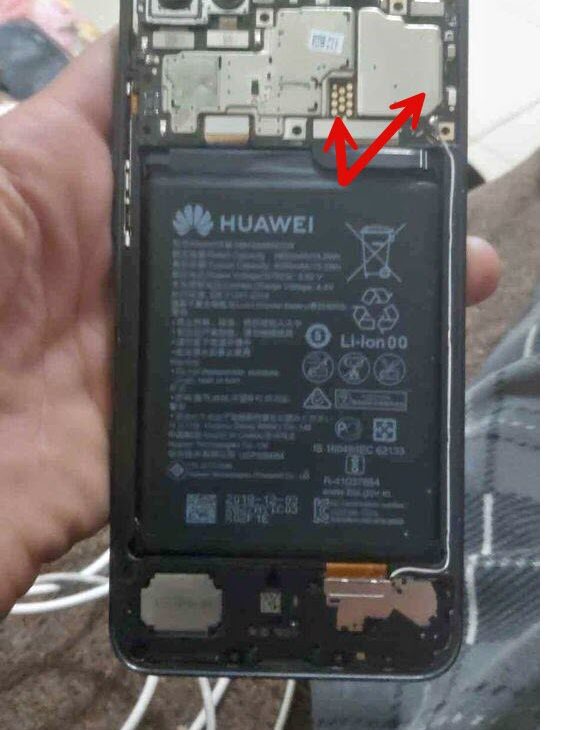
how To connect huawei p30 lite frp test point Lite, follow these general steps:
- Identify Test Points: Locate the test points on the motherboard of your Huawei P30 Lite. You may need to refer to schematics or guides specific to your device model to identify the test points accurately. They are usually small metallic pads that need to be shorted.
- Prepare Conductive Material: You’ll need a conductive material, such as a pair of tweezers or a thin wire, to short the test points. Make sure the material is clean and does not have any electrical conductivity issues.
- Power Off the Device: Before attempting to connect the test points Huawei P30 Lite is powered off completely.
- Disassemble the Device: Disassemble your Huawei P30 Lite carefully to access the motherboard. This may involve removing the back cover, battery (if removable), and other components to expose the test points.
- Connect the Test Points: Using the conductive material (tweezers or wire), carefully short the test points by touching both points simultaneously. Keep the points shorted while connecting the device to your computer via USB.
- Connect to PC: While keeping the test points shorted, connect your Huawei P30 Lite to your computer using a USB cable. The device should enter a specific mode, often referred to as “Download Mode” or “Test Point Mode.”
- Use Flashing Tool: Once the device is in the correct mode, you can use a compatible flashing tool (such as SP Flash Tool or Huawei Update Extractor) to perform actions like flashing firmware onto the device.
- Disconnect and Reassemble: After completing the necessary actions, disconnect the device from your computer, remove the short on the test points, and carefully reassemble your Huawei P30 Lite.
image huawei p30 lite frp test point
