Instructions on how to install a new firmware version (official or custom) on a Xiaomi Pocophone F1 smartphone, step-by-step instructions on how to unlock the bootloader and restore the brick, install the modified TWRP recovery and obtain Root superuser rights.
Xiaomi Pocophone F1 firmware using PC via Fastboot
With this guide, you can:
- Install firmware
- Install custom TWRP recovery
- Restore the performance of the Pocophone F1 smartphone during bootloop (cyclic phone reboot), due to unsuccessful firmware or any other shenanigans with it
- Restore the original state of the device (stock, clean firmware) and remove all traces of interference with the system.
- Update or, conversely, downgrade the firmware version at your discretion.
1 . To install the official firmware via the fastboot, you need to download the firmware and driver for the Pocophone F1 smartphone, in accordance with the OS of your PC. The downloaded installation files need to be unpacked to any folder on the PC, I usually unpack the archive to the root folder, for example “D: \\ xiaomi”
OFFICIAL GLOBAL STABLE ROM FOR POCOPHONE F1
| V12.0.3.0.QEJMIXM | 10.0 | 1.9G | Download |
| V12.0.1.0.QEJMIXM | 10.0 | 1.9G | Download |
| V11.0.9.0.QEJMIXM | 10.0 | 1.9G | Download |
| V11.0.5.0.PEJMIXM | 9.0 | 1.8G | Download |
| V11.0.4.0.QEJMIXM | 10.0 | 1.9G | Download |
| V10.3.8.0.PEJMIXM | 9.0 | 1.8G | Download |
| V10.3.7.0.PEJMIXM | 9.0 | 1.8G | Download |
POCO F1 UNOFFICIAL FIRMWARE
Install this ROM via TWRP Custom Recovery.
Xiaomi.EU MIUI 10 | Android 8.1 | 8.9.13 | If your system crashes randomly try installing the following
Xiaomi.EU MIUI 10 | Android 8.1 | 8.9.20 | Download
Xiaomi.EU MIUI 10 | Android 9.0 | 10.1.3.0 | Download
DOWNLOAD UNOFFICIAL TWRP 3.2.3.0 FOR POCOPHONE F1
You’ll need to download and flash TWRP Custom Recovery if you want to flash the custom and unofficial ROMs. Before installing TWRP you must unlock the bootloader. TWRP in installed from fastboot. Please read the XDA thread for more information.
2. Then you need to download the official firmware for Pocophone F1 –
3. Unpack the contents of the folder in the * .tgz image (archive) of the firmware into the previously unpacked folder “xiaomi”.
4. Next, I’ll tell you how to install drivers for Fastboot mode. For Linux and MacOS, you do not need to install drivers, they are included by default with these operating systems.
4.1. Turn off the smartphone and then turn it on while holding down the power button + the volume down key and then connect it to the PC, this way you turn on the bootloader mode (Bootloader / Fastboot) on the phone,
4.2. We go to the PC device manager. There should be displayed a device “Android” or “Xiaomi Poco f1” with a yellow exclamation mark
4.3. Right-click on the device and select the option – “Update drivers”. Then – “Search for drivers on this computer.” Be sure to put a check mark on “Including subfolders”. Press the “Browse” button and specify the path to the “usb_drivers” folder in the previously unpacked “Tools” folder.
4.4. Click the “Next” button. We are waiting for the end of the installation. That’s it, the drivers are installed.
5. Before flashing the smartphone, you need to do Unlock Bootloader Xiaomi Pocofone F1 (unlock the bootloader on your device)
In order to unlock the bootloader on Poco F1, you need to go to the phone settings in me – the “For developers” menu (Go to “Settings” -> “About phone” -> 7 times click on the “Build number” item)
In the tab that appears “ For Developers “in the main settings menu, activate the item:” Factory unlock “-” (Enable OEM Unlock) “.
Note: The operation of manually unlocking the bootloader can be omitted, since the bootloader is automatically unlocked when flashing the image and will be locked back after the flashing process is over.
6. Now let’s go directly to the process of flashing the Pokophone.
6.1 Reboot the phone into Bootloader / Fastboot mode. With the device off, simultaneously press and hold the power button + volume down key and connect the device to the PC
In the folder where the ADB program is saved, hold down shift in an empty area and right-click, select “open a command window” in the context menu that appears, and write in the command line:
adb reboot bootloader
And we enter the command to check if your PC sees the connected smartphone:
fastboot devices
If all is well, the drivers have been successfully installed and the phone is correctly connected – you will see the following response:
<device serial number> fastboot or product: beryllium
6.2 At the command line, run one of the following commands:
fastboot oem unlock
or
fastboot flashing unlock
The teams are equal, we choose any.
6.3 Return to the previously unpacked “Xiaomi” folder. Select and run one of the automatic firmware scripts in accordance with the OS used and the desired firmware mode:
Windows :
“ flash_all.bat ” – for automatic flashing, deleting all data on the device and then saving the open bootloader status.
“ Flash_all_except_storage.bat ” – for automatic flashing, saving all data on the device and then blocking the bootloader.
“ Flash_all_lock.bat ” – for automatic flashing with deletion of all data on the device and subsequent blocking of the bootloader.
Linux / MacOS :
“ flash_all.sh ” – for automatic flashing, deleting all data on the device and then saving the open bootloader status.
“ Flash_all_except_storage.sh ” – for automatic flashing, saving all data on the device and then locking the bootloader.
“ Flash_all_lock.sh ” – for automatic flashing with deletion of all data on the device and subsequent blocking of the bootloader.
After starting the script, the process of flashing the Pocophone F1 will begin, it usually lasts a couple of minutes, at which time you can go to the kitchen to make yourself tea with liver. At the end of the firmware, the phone will reboot itself. Please note that the first download after applying any update can be quite long.
Installing custom firmware on Pocophone F1
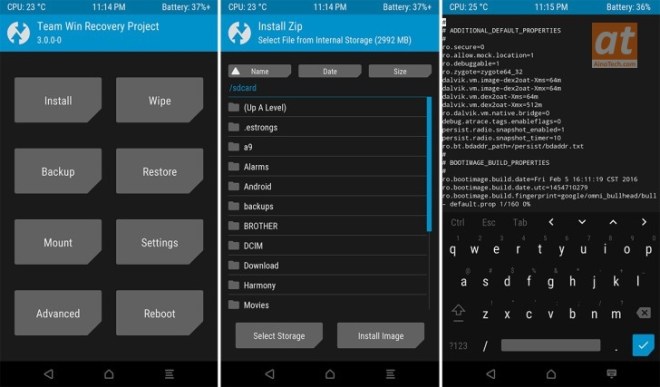
The easiest and most common way to install custom (or modified) firmware on a smartphone is through TWRP recovery.
Installing TWRP Recovery on Pocophone F1

In no case can you flash TWRP recovery if you have root rights obtained through SuperSU (CF-Auto-Root). Otherwise it will cause a bootlap (cyclic reload).
Temporary TWRP download – TWRP is not installed on the smartphone, but only one pink starts up in order to perform certain tasks. TWRP Firmware – Installing TWRP on a permanent basis. It is an application of a kernel modification (boot), Violates the integrity of the kernel (boot).
The first step is to get developer rights and unlock the bootloader. We go to the settings – about the device – we tap on the MIUI version until it says that you have become a developer. Further settings – in addition – for developers (developer mode), we look to enable factory unlock and USB debugging. In this menu, we look at the bootloader unlock status (the easiest way), sometimes the item may differ slightly.
Download from the previous paragraph “Required software for firmware” for your OS. And unpack any folder on your PC (preferably to the root of the disk)
Then download custom TWRP recovery for Pocophone F1 twrp 3.2.3.0 beryllium and unzip all downloaded stuff into the previously created folder.
According to the instructions above, you need to install drivers for fast boot mode and unlock the smartphone bootloader
After unlocking the Pocophone F1 and installing all the drivers, the smartphone must be switched to Bootloader Mode (bootloader mode), for this, on the switched off phone, simultaneously press the power key + the volume down key, and connect the smartphone to the PC with a standard USB cable.
Open the previously created folder, and there we hold down the Shift key + right-click on an empty area of the folder. In the menu that appears, click on the “Open command window” item.
If you have Windows 10 – run the command line directly from the address bar of the utilities folder by entering the command “cmd”.
In the PowerShell menu that opens, write the command
cmd
then we write the command
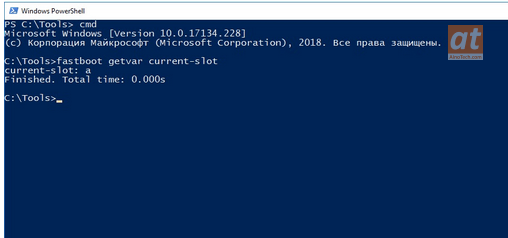
fastboot getvar current-slot
this is done in order to see which section in the phone is currently selected, by default it is always “A”.

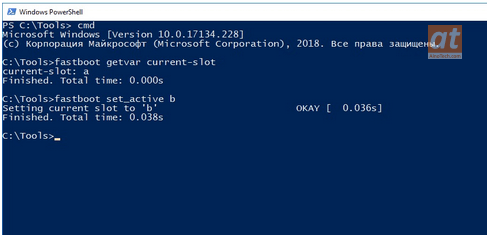
If yours is as in the pictures, then we write the following
fastboot set_active b
the following message should appear.

Next, we prescribe such a command that activates the download of the recovery to the smartphone.
fastboot flash boot_b twrp.img
Further, before writing the next command, you need to hold down the volume key + (that is, up) after holding down, enter the command
fastboot reboot
and press Enter. Next, we are waiting for the download of TWRP-recovery.
As soon as you boot TWRP-Recovery, you will be prompted for a password to unlock the Data section, just click Cancel, do Swipe and go to TWRP itself.
After you have done everything that you needed in TWRP, before restarting the phone, you need to put the section again, Otherwise, the phone will not boot. How to do it ? very simple. In TWRP, click Reboot at the bottom and select Slot A, then just click Reboot System.
What does this instruction give us, an almost-working TWRP (why almost, in order to re-enter TWRP, you will need to repeat Point 5 of this instruction, that is, select section B to enter Recovery.).
That’s all, custom TWRP recovery is installed on your smartphone, now you can install any Non-official firmware on Pocophone.
Installing custom firmware on Xiaomi Pocophone F1
If, while using the firmware, some fixes, kernels were not installed correctly, something was deleted in the system, because of this errors, glitches, or the device does not boot into the system, etc., download the firmware that you currently have on board, for recovery, we throw it into the phone, wipe both caches and flash the firmware, everything should work, except that various mods, custom kernels and other “goodies” will be deleted in order to restore the system as you had before … without flashing with at the top of the firmware you need to do Backup from under TWRP
In order to install custom firmware on a smartphone, the bootloader and the installed custom TWRP Recovery must be unlocked on this phone. If there is no 1 and 2 – read above.
And so to install the modified firmware on Xiaomi Pocophone F1 you need to:
Download any TWRP firmware you like for Poco f1, for example:
| Nitrogen-OS-P-beryllium (9.0) | download |
| Omni ROM unofficial Pie (9.0) | download |
or any other firmware for xiaomi pocophone f1 for installation via custom TWRP recovery.
Restart your phone in TWRP Recovery Mode in one of the following ways:
a) Turn off your phone. With the phone turned off, press and hold the Volume up (+) and Power on rocker until recovery is loaded.
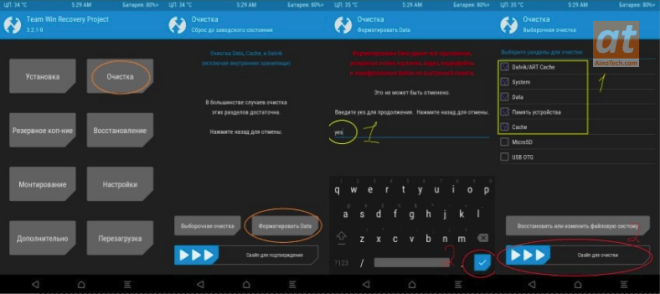
In TWRP Recovery, wipe everything except SD and OTG. In the main menu: Wipe> Advanced Wipe> check Dalvic, Cache, System, Data, Internal Storage. Attention: all data will be deleted, the phone will be completely clean!

Tap Back, Tap Reboot recovery and swipe right.
Connect the phone using a USB cable and move the archive with the firmware to the phone. If you have a flash drive (sd-card / usb otg-flash), then I recommend uploading the firmware to the flash drive (if you upload the firmware into the internal memory of the phone and flash it from TWRP, then in Additional Settings – Memory – Others will be hammered with this firmware.I
recommend throwing the firmware to a USB flash drive or an otg-flash drive.In this case, the size of the Other will remain the same, but it still always occupies at least 200
MB.It also applies to backups from TWRP.I recommend making them on a USB flash drive or an otg-flash drive).
Press the Install button, select the archive with the firmware and swipe to the right to confirm the desire to flash the archive. We are waiting, the screen may not change for a long time. Calm down, you can go make yourself a cup of tea with liver, we are waiting for the end of the firmware.
After the firmware, you need to clean up the garbage after you, for this we press the Wipe cache / dalvik button, after which we boldly reboot the smartphone by clicking for this – Reboot System.
A good sign of a successful firmware is the running three dots under the Mi logo. The first load can last about 10 minutes, we continue to eat liver with tea.
In the same way, we can sew mods, fixes, etc. through TWRP separately to the firmware.
In case you have not made a backup of the firmware and thanks to mod, fix, etc. the phone does not boot (often hangs on the MI logo), you can artificially reboot into recovery (power button + volume plus, until victorious “), make wipe cache and re-flash our firmware, in which case 99% of the firmware will boot safely, thereby avoiding data loss