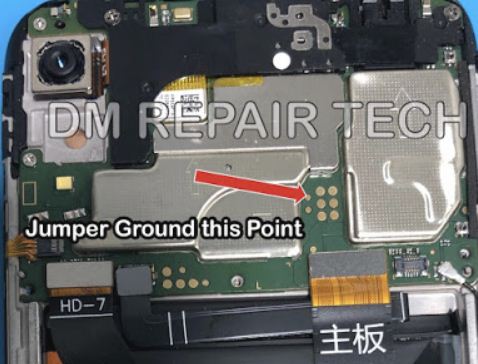
free remove frp Huawei Y6 2019 (MRD-LX1) test point by file scatter reset bypass frp Huawei Y6 2019 Factory Reset Protection + image test point Huawei Y6 2019 .
image test point Huawei Y6 2019

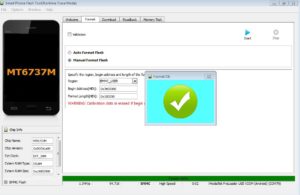
Download sp flash tool after Click ON SP Flash tool Tab Format–> Manual Format Flash–> Being Address [HEX]: 0x108000–> Format length [HEX]: 0x100000.

how to flash Huawei Y6 2019 (MRD-LX1)
Flashing a Huawei MRD-LX1 (Huawei Y6 2019) using the test point method typically involves shorting specific points on the device’s hardware to force it into a mode where it can be detected by flashing tools. Here’s a general outline of the process:
- Prepare Your Equipment: Ensure you have all the necessary equipment ready, including a compatible USB cable, a computer with necessary drivers installed, and the firmware files for your device.
- Identify Test Points: Locate the test points on the Huawei MRD-LX1 motherboard. Test points are small soldering points usually labeled TP1, TP2, etc. You may need to refer to technical documentation, forums, or guides specific to your device to find the exact locations of these points.
- Short Test Points: With the device powered off, carefully short the designated test points using a conductive material, such as tweezers or a metal wire. This step is crucial for putting the device into a mode where it can be detected by the flashing tool.
- Connect the Device to the Computer: After shorting the test points, connect your Huawei MRD-LX1 device to your computer using a USB cable.
- Open Flashing Software: Launch the flashing software on your computer. Popular flashing tools for Huawei devices include Huawei’s official HiSuite, SP Flash Tool, or Miracle Box.
- Load Firmware Files: In the flashing software, locate and load the firmware files (usually in the form of a scatter file or a firmware package) for your Huawei MRD-LX1 device.
- Start the Flashing Process: Follow the on-screen instructions provided by the flashing software to start the flashing process. This may involve selecting specific options or configurations depending on the flashing tool you’re using.
- Wait for Completion: Once the flashing process begins, wait patiently until it completes. Do not disconnect the device from the computer or interrupt the process as it may result in a bricked device.
- Finish and Reboot: After the flashing process is complete, the software should display a success message. You can then safely disconnect your device from the computer and reboot it.
info :
DevicelD: “MediaTek DA USB VCOM (Android)” -> Jumping to Ux200000: ok. ->Successfully received DA sync
-> DRAM config needed for: 90014a6842386150 -> Sending emi data…
-> DRAM setup passed.
=>Sending emi data succeeded.
-> Uploading stage 2…
=> Upload data was accepted. Jumping to stage 2…
-> Successfully uploaded stage 2
-> EMMC FWVer: 0x0
-> EMMC ID: hB8aP>
-> EMMC CID:90014a68423861503e010958d2ceb62f
-> EMMC Boot1 Size: 0x400000
EMMC Boot2 Size: 0x400000
EMMC GP1 Size: 0x0
->EMMC GP2 Size: 0x0
EMMC GP3 Size: 0x0
EMMC GP4 Size: 0x0
-> EMMC RPMB Size:0x1000000
->EMMC USER Size: 0x747c00000 HW-CODE: 0x717
HWSUB-CODE: 0xBA00
HW-VERSION: 0xCA01
SW-VERSION: 0x200
CHIP-EVOLUTION: 0x0
->DA-VERSION: 1.0
->Upload data was accepted. Jumping to stage 2…
->DA Extensions successfully added
->Write partition…
->FRP Reset New… OK
It’s important to note that flashing your device using the test point method carries risks, including potential damage to your device if not done correctly. Make sure to follow instructions carefully and double-check all steps before proceeding. Additionally, ensure you have the correct firmware files compatible with your device to avoid any issues during the flashing process.